Here is how to build a hip roof in four stages.. Set the common rafters and ridge board first. Add hip rafters at the four corners next. Fill in jack rafters after that. Finish with sheathing and covering. Each stage depends on the one before it. Skipping the order causes real problems later. A hip roof is doable for an experienced DIYer on a shed, garage, or small addition. Larger or complex builds usually call for a licensed framing crew.
This guide walks through the full sequence in order. You will find the tools you need. You will learn how each type of rafter gets cut and set. You will get a working technique for keeping hip rafters straight. You will see how to finish the roof with sheathing, shingles, and ridge cap. It ends with a clear decision on when to do this yourself and when to call a contractor.
✓ Key Takeaways
- A hip roof goes up in a fixed order. Common rafters and ridge first. Hip rafters second. Jack rafters third. Then sheathing and covering.
- Hip rafters run diagonally from each corner to the ridge. They need a different length and angle than common rafters. They are not just a longer version of the same cut.
- A string line anchored at the ridge and the wall plate keeps a hip rafter straight. This works while jack rafters get nailed in on both sides.
- OSHA requires fall protection for residential work above 6 feet. This falls under 29 CFR 1926.501(b)(13).
- A hip roof costs more to frame than a gable roof of the same footprint. It sheds wind and water from all four sides instead of two.
What do you need before you build a hip roof?
Building a hip roof is defined as the process of framing a roof structure. All four sides slope down to the exterior walls. This uses common rafters, a ridge board, hip rafters, and jack rafters. These parts get assembled in a specific order. You need three things before you cut a single board. Confirmed dimensions. The right tools. A safety plan.
Your building length, width, and roof pitch drive every measurement that follows. You could work these out by hand with a framing square. It is faster to use the Hip Roof Calculator on this site instead. It converts your dimensions and pitch directly into four numbers. These are hip rafter length, common rafter length, ridge length, and cut angles.
For tools, gather a circular saw and a framing square or speed square. Add a hammer or framing nailer, a tape measure, a chalk line, and temporary bracing lumber. A ladder or scaffolding rated for the work height is required. You also need fall protection equipment. OSHA requires fall protection for residential construction work performed 6 feet or more above the ground. This falls under 29 CFR 1926.501(b)(13). That section covers roof framing directly.
Check with your local building department before framing begins. Most jurisdictions require a permit for new roof construction or a significant addition. An inspector will typically check the framing before it gets covered.
What is the basic framing sequence for a hip roof?
The basic framing sequence for a hip roof has five stages. Each stage has to be finished before the next one starts. Skipping ahead causes real fitting problems. Cutting hip rafters before the ridge is set is a common example. It produces rafters that do not fit correctly once the frame is actually standing.
| Stage | Action | Purpose |
| 1 | Set common rafters and raise the ridge board | Establishes the roof’s height and centerline |
| 2 | Cut and install hip rafters at all four corners | Connects the ridge ends to the building corners |
| 3 | Install jack rafters between hips and walls | Fills the short ends of the roof |
| 4 | Sheath the roof | Creates the solid surface for roofing material |
| 5 | Shingle and cap | Weatherproofs the finished structure |
Each stage in this table gets its own detailed walkthrough below. The rest of this guide follows this exact order.
How do you set the common rafters and ridge board?
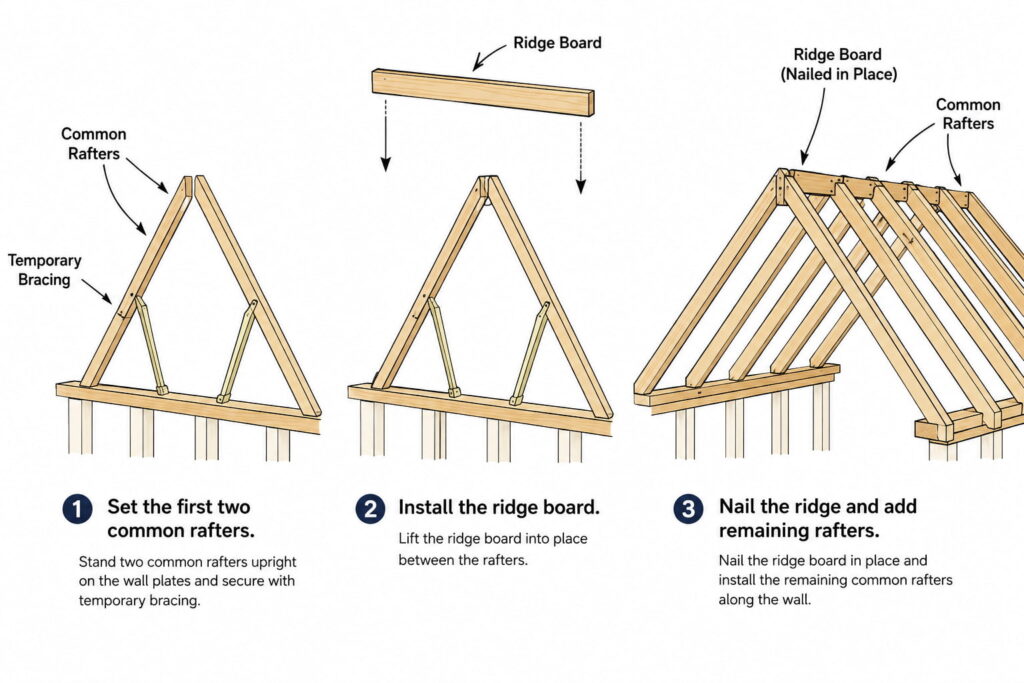
You set the common rafters and ridge board in two moves. Stand the first few common rafters upright on the longer walls. Then nail the ridge board between them while they hold it in place. This gives the ridge a stable starting point. The rest of the roof gets built around it.
Cut your common rafters first. Use the length from the Hip Roof Calculator on this site. Each common rafter needs three cuts. A ridge cut at the top where it meets the ridge board. A birdsmouth cut where it sits on the wall plate. A shoulder cut that extends past the wall to form the overhang.
Stand 2 to 3 common rafters upright on each of the longer walls. Space them evenly and brace them plumb for now. Lift the ridge board into place between these rafters. Nail it to each one. The ridge should now be self supporting with just these first few rafters holding it level.
Once the ridge is secure, add the remaining common rafters. Space them along both long walls at your planned spacing, typically 16 or 24 inches on center. Nail each one to the ridge board. Toe nail it into the wall plate below the birdsmouth cut.
How do you cut and install hip rafters?
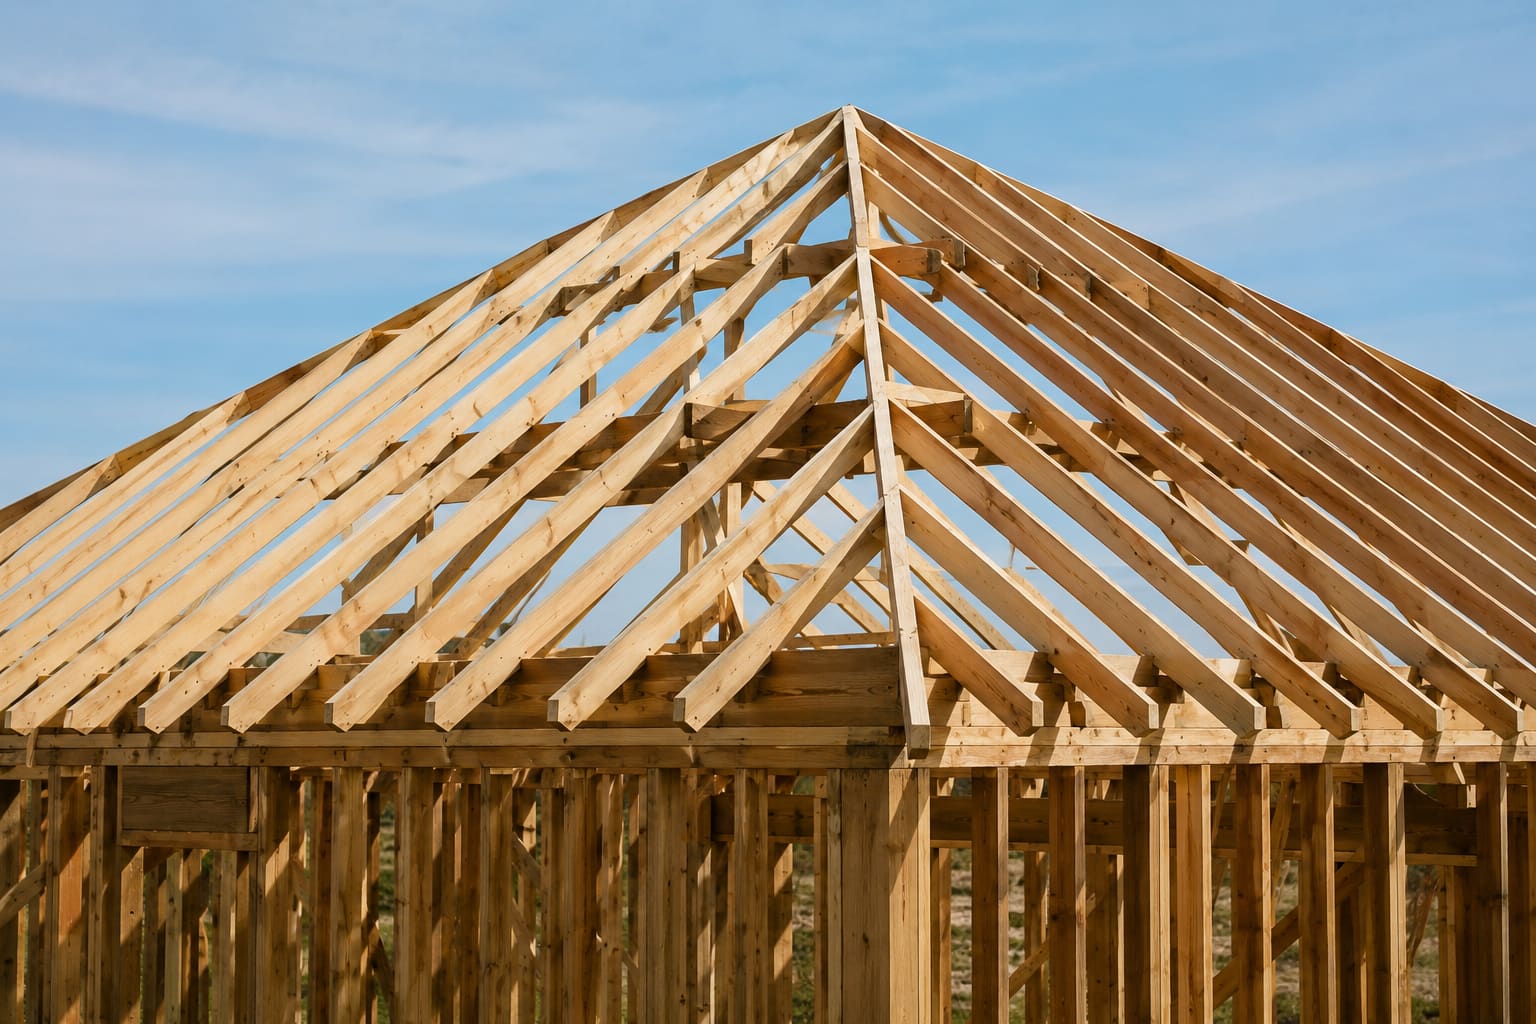
You cut and install hip rafters in two steps. Measure the hip length and angle for your specific pitch. Then nail each hip rafter from a corner of the building up to the end of the ridge board. A hip rafter is not a longer version of a common rafter cut at the same angle. It travels diagonally across the roof instead of straight up the slope.
Because of that diagonal path, a hip rafter needs its own length and its own plumb cut angle. Both are shallower and longer than a common rafter at the same nominal pitch. The Hip Roof Calculator on this site returns the exact hip rafter length. It also returns the cut angle for your building dimensions and pitch. You are not working this out by hand at the saw.
Cut four hip rafters using those numbers. Each one gets a plumb cut at the top to meet the ridge. Each gets a birdsmouth cut at the bottom to sit on the corner of the wall plate. Each also gets a side cut, sometimes called a cheek cut, where the top meets the ridge end and the opposing hip.
Nail each hip rafter from the ridge end down to the building corner. Work one at a time. Check that it sits flush at both connection points before moving to the next. All four hips should end up symmetrical. This confirms your ridge and common rafters were set correctly in the previous stage.
How do you install jack rafters on a hip roof?
You install jack rafters by nailing them between the hip rafter and the wall plate. Work in pairs. Start at the center of each short end and move outward toward the corners. Jack rafters fill the triangular gaps. These sit between the hip rafters and the building walls on the short ends of the roof.
Each jack rafter gets shorter as it moves away from the corner. It meets the hip rafter at a different point along the hip’s diagonal length. The first jack rafter near the ridge is the longest. Each one after it shortens by a consistent amount based on your rafter spacing.
A string line helps keep the hip rafter straight while you nail in this many jack rafters. Anchor one end of the string at the point where the hip meets the ridge. Anchor the other end where the hip meets the wall plate. Run the line along the hip’s centerline. Check the hip against this line periodically as you work. Repeated nailing of jack rafters can pull a hip rafter out of true if it goes unchecked.
Work in matched pairs on both sides of the hip when possible. Alternate sides as you move outward. This balances the load on the hip rafter as you go. It avoids loading one side heavily before starting the other.
How do you sheath, shingle, and cap a hip roof?
You sheath a hip roof by installing plywood or OSB panels in rows. Start at one corner and work across each roof plane. Then shingle it with a higher waste allowance than a gable roof. Finish with ridge and hip cap.
Start your first sheathing panel at a corner of the roof. Work your way across that plane. Stagger the seams between rows the way you would on any roof. Hip roofs have more angled cuts at the hip lines than a gable roof does. Expect more waste in your sheathing material and plan panel layout accordingly.
Finish sheathing and cover it with underlayment first. After that, shingling a hip roof follows the same basic technique as a gable roof. Every hip line needs angled cuts on both sides. Hip roofs typically need 15 to 20 percent waste allowance instead of the 10 percent standard for a simple gable. Offcuts at angled hip lines usually cannot be reused. For the exact waste percentage and bundle count for your specific hip roof, the Shingle Calculator on this site has a dedicated hip roof section that handles this calculation.
Ridge cap and hip cap go on last. They cover the peak and every hip line. Are you using metal roofing instead of shingles? Metal ridge cap on a hip roof needs overlap and fastening detail specific to the hip’s angle. This differs from a straight ridge run. Confirm your metal panel manufacturer’s hip cap instructions before installing.
How do you vent a hip roof?
You vent a hip roof using the same intake and exhaust principle as any roof. Hip geometry often means less usable ridge length for exhaust venting. A gable roof of the same footprint usually has more. A hip roof’s ridge only runs the length of the building minus its width. The hip ends eat into the available ridge space.
Soffit vents along the eaves provide intake air on all four sides of a hip roof. This is actually an advantage over a gable roof, which only has soffits on two sides. Ridge vents provide exhaust along whatever ridge length remains. On a smaller or nearly square hip roof, the ridge can be very short or nonexistent. Other exhaust options become worth considering here. These include a small gable vent built into one hip end, or additional roof vents.
Balance intake and exhaust area roughly evenly for the best airflow. Confirm your specific ventilation ratio requirement first. Check your local building code before finalizing vent sizing.
Should you build a hip roof yourself or hire a contractor?
Build a hip roof yourself if it is a shed, a small garage, or another simple structure. You should already have basic framing experience. This includes comfort with a circular saw and a framing square. This keeps the scope small enough that mistakes are inexpensive to fix. The roof height also stays manageable without specialized lift equipment.
Hire a licensed contractor in three cases. The structure is a full home addition. The roof pitch is steep enough to require fall protection systems and staging for most of the work. Your local code requires stamped engineering drawings for the permit. A contractor also makes sense in one more case. This is when you are building with engineered hip trusses instead of site cut rafters. A hip truss set is ordered as a factory built package rather than framed board by board. The Roof Truss Calculator covers that alternative method in full. So does this site’s Types of Roof Trusses guide.
Are you unsure which category your project falls into? Get a quote from a licensed framing contractor before committing to a DIY approach. A quote costs you nothing. It gives you a real comparison point for the time and tools a DIY build would actually require.
What are common mistakes when building a hip roof?
Cutting hip rafters using the common rafter angle is the most common and most costly mistake. A hip rafter’s plumb cut is always shallower than a common rafter’s plumb cut at the same nominal pitch. Using the wrong angle leaves a gap at the ridge connection. That gap has to be patched or recut.
Skipping temporary bracing on the first common rafters causes real problems. The ridge board can shift or fall before enough rafters are in place to hold it steady. Brace the first rafters plumb and secure. Do this before lifting the ridge board into position, not after.
Assuming a jack rafter is just a common rafter cut short leads to fitting problems. A jack rafter’s length depends on its specific position along the hip. So does the way it meets the hip rafter. Neither one is a simple proportional shortening of the common rafter length.
Do not nail jack rafters on only one side of a hip before starting the other side. This pulls the hip rafter out of straight alignment. Work in matched pairs on both sides of each hip instead. Check against a string line periodically. Do not finish one side completely before starting the second.
Starting construction without confirming permit requirements causes real delays. Framing that goes up without an approved permit causes a real risk. Inspectors can require it to be partially disassembled. That costs far more time than checking with the building department first.
Frequently asked questions
How do you build a hip roof?
You build a hip roof by setting common rafters and the ridge board first. Add hip rafters at the four corners next. Fill in jack rafters between the hips and the walls after that. Finish by sheathing and covering the finished frame. Each stage depends on the one before it being complete and square.
How do you frame a hip roof?
Framing a hip roof follows the same five stage sequence as building one. Common rafters and ridge. Hip rafters. Jack rafters. Sheathing. Then covering. The framing stage refers specifically to the structural wood assembly. This happens before sheathing and roofing material go on.
How do you shingle a hip roof?
Shingle a hip roof the same way you would a gable roof. Plan for 15 to 20 percent waste instead of the standard 10 percent. Every shingle course crossing a hip line needs an angled cut. Get your roof area first. Then the Shingle Calculator on this site calculates the exact bundle count and waste allowance for a hip roof.
How do you construct a hip roof?
Constructing a hip roof means completing the full sequence. This starts with confirmed measurements. It moves through common rafters, hip rafters, and jack rafters. It ends with sheathing and final roofing material. The Hip Roof Calculator on this site provides those rafter lengths and angles. Get them before construction begins.
How do you vent a hip roof?
Vent a hip roof using soffit intake vents along all four eaves. Pair these with ridge exhaust venting along whatever ridge length the roof has. A hip roof has a shorter ridge than a gable roof of the same footprint. This sometimes calls for supplemental venting options. This matters most when the ridge alone cannot provide enough exhaust area.
How do you install ridge cap on a metal hip roof?
Install ridge cap on a metal hip roof using overlap and fastening details specific to the hip’s angle. A hip cap transition is not a straight run the way a gable ridge cap is. Confirm your specific metal panel manufacturer’s hip cap instructions before installing. Overlap requirements vary by product and panel profile.
I am building a shed with a hip roof. Can I frame it myself without a crew?
Yes, a shed sized hip roof is a reasonable DIY project for someone with basic framing experience. The small scale means mistakes are cheap to fix. You can generally work with one or two helpers rather than a full crew. This works especially well if you cut rafters on the ground and lift them into place one at a time.
What is the difference between stick framing a hip roof and ordering a hip truss package?
Stick framing means cutting and assembling common rafters, hip rafters, and jack rafters on site, board by board. That is what this guide covers. A hip truss package uses factory engineered trusses delivered as a complete kit instead. These install faster but must be ordered to precise specifications in advance. The Roof Truss Calculator on this site covers hip truss set cost and planning for that alternative method.
How long does it take to frame a hip roof on a garage addition?
Framing time for a garage sized hip roof depends heavily on experience level and crew size. This guide does not provide a fixed timeline. Conditions vary too much from one project to the next. A realistic approach works in three stages. Frame the common rafters and ridge on day one. Add hips and jacks on day two. Treat sheathing as a separate stage once the frame is confirmed square and plumb.
The bottom line
A hip roof goes up in a specific order for a reason. Common rafters and the ridge give the structure its centerline and height. Hip rafters connect that ridge to the building’s corners. Jack rafters fill in everything else before the roof gets sheathed and covered. Get your rafter lengths and angles from the Hip Roof Calculator before you cut anything. Keep hip rafters straight with a string line while jack rafters go in. Confirm your permit and fall protection needs before framing starts. This guide is built for informed decision making. Always consult a licensed local contractor. This applies to a binding quote or a structural determination.
Quick Summary
- The five stage sequence runs in order. Common rafters and ridge. Hip rafters. Jack rafters. Sheathing. Then shingling and cap.
- Hip rafters need their own length and angle, not a longer version of the common rafter cut.
- A string line keeps a hip rafter straight while jack rafters are nailed in on both sides.
- Sheds and small garages are reasonable DIY hip roof projects. Additions and steep pitches usually call for a contractor.
- Fall protection is required at 6 feet under OSHA 29 CFR 1926.501(b)(13). A local permit check should happen before framing starts.